This document is a summarised version of OG_RS5-Personal Duress Pendants – Application and Use & OP_Rs5-Management of Code Grey and Duress Alarms. The summary has been created to be Emergency Department specific, and has been endorsed by the ED Leadership Team and Sunshine Hospital Security Management. Staff should review the PPG’s if they require further information.
Overview:
This QRG provides an overview of the application and use of the duress systems within the SHED.
The intent of this document is to put in place control measures that give staff the ability to easily call for assistance when a situation has the potential or does escalate outside of the staff member’s control, and to ensure an effective and efficient process is in place to respond to a duress activation.
Applicability:
This QRG relates to all SHED staff and all SHED Security staff.
Responsibility:
The SHED Nurse Unit Manager, Medical Directors (Adult and Children) and Clerical Manager are responsible for ensuring personal duress alarm management process is in place, and that all staff are aware of the local area response for personal duress activation.
The Security Manager is responsible for ensuring that all security officers are aware of this process and are able to efficiently and effectively respond to SHED duress activation.
Guideline/Process Details:
Duress alarm systems within the SHED
As part of the Western Health Security Management System (SMS), there are a number of duress alarm solutions in the SHED. The SHED has both fixed and personal duress alarms.
Fixed Duress Alarms
Within SHED fixed duress alarms will be located in the following places from June 2021:
| Staff Bases (including triage) |
Ground Floor X-Ray Room & Level 1 X-Ray Room |
| Resuscitation central area and each cubicle |
Reception Areas |
| Interview Rooms |
Triage Assessment Rooms |
| WestCASA |
Treatment Rooms |
| Adult Acute Area |
Resuscitation Negative Pressure Room |
| Behavioural Assessment Unit |
BAR |
| Fast Track |
The Hub |
|
|
Traditional fixed duress alarms are silent at the activation point. When activated these alarms provide a prioritised security response however generally there is no local area alert.
There are three types of fixed duress alarms in the SHED – two-button fixed duress, single-button fixed duress, and lockdown duress.
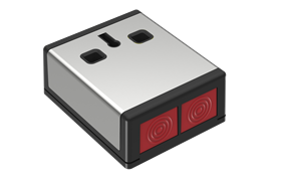
The two-button fixed duress is a silver rectangular box with two square red buttons on the bottom of the device (refer Image 1).
To activate the two-button fixed duress, both red buttons must be pressed at the same time. Once activated, there will be a security response as per the Management of Code Grey and Duress PPG. Once activated, these duress buttons must be reset by Security – they will not reset automatically.
|
|
Image 1: Two-button fixed duress
|
 |
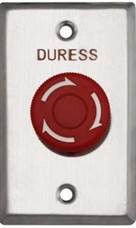
The second type of fixed duress is the single-button fixed duress already existing within the SHED (refer Image 2). On activation, these duress will have the same response as the two-button duress and will also require reset by Security after activation.
|
|
Image 2: Single-button fixed duress
|
 |
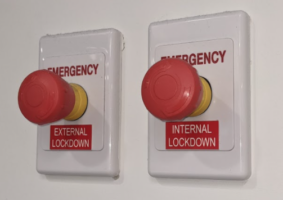
The third type of fixed duress is the lockdown duress which is located inside of the triage staff base. There are two of these duress buttons located next to each other – one Internal Lockdown duress and one External Lockdown duress. Activation of the lockdown duress will trigger a security response. Both duress buttons will require resetting by security once pressed.
The internal lockdown duress results in automatic locking of the adult waiting room doors and the door within the corridor to the children’s area waiting room. Doors leading outside of the department will remain unlocked.
Activation of the external lockdown duress results in automatic locking of the two sets of doors leading outside from the waiting room foyer.
For further information on the lockdown procedure, please review the Lockdown Processes – SHED QRG.
Personal duress alarms
Personal duress alarms are held on the staff member’s person, and in the SHED are silent at the activation point. If a situation is escalating or the staff member feels it has the potential to escalate, they will press the button on the front of the pendant to activate a response.
|
|
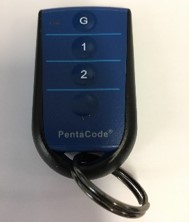
Image 3: Personal duress
|
 |
Activation of a Duress
Due to the multi-level design of the SHED, all personal duress pendants assigned to ED staff have been designed to transmit throughout all levels of the department. The issued personal duress pendant will have three labelled buttons corresponding to each level in the department. When required to activate the personal duress pendant ED staff are required to press down the button relevant to the level they are situated on at the time.
When pressed, the activation will alert Security via pager of the pendant description (e.g. ED – NIC) and the level the staff member is situated when pressed. Security will attend as a priority response.
If the NIC and the Security Officer are alerted of a duress the response will be to huddle with the staffing group and work quickly to identify any missing staff or a threat to the personal safety of the staff and other patients in the department.
Personal duress pendants do not require a manual reset after activation; they will automatically reset 30 seconds after each activation.
The personal duress systems do not replace any safety measures already in place. The personal duress pendants are designed to provide an additional level of safety and support to staff while engaging in 1:1 patient care.
Management of Personal Duress Alarms:
All Medical, Nursing and Clerical staff will be assigned a personal duress on shift.
The allocation of duress and the unique pendant code aligned to each role in the department is included in Appendix 1.
Clerical Personal Duress Alarms are located and signed out at the Comms Desk.
For Medical and Nursing it is the responsibility of each staff member to handover there personal duress alarm to the oncoming staff member either when they leave the floor or if they finish there shift. Overnight when the staffing profile reduces excess duress alarms should be stored with the Nurse In Charge (NIC).
The daily process for managing the duress pendants is as follows:
- The drugs checked and correct call – will now become the drugs correct and checked – please remember to handover your personal duress alarms call.
- Staff compliance with carrying personal duress alarms will be reported in at the 0830, 1600 and 2200 – huddles. The area leads are included in Table 1. Leads are to report into the NIC or the SMOIC by exception (if a pendant is discovered to be missing)
At the 0830, 1600, and 2200 the Medical Officer in Charge and NIC will need to sign the duress check log – verifying that the duress alarms were checked and no issues or lost pendants were recorded.
It is the NUM/Medical Directors responsibility to account for the pendants and alert the Security Manager as soon as practical in the event that any pendants are lost (it is the responsibility of the ward/area to pay any replacement costs associated with a lost duress pendant).
 Open Menu
Close Menu
Open search
Open Menu
Close Menu
Open search
